Table of Contents
Setting Broadcasting with Delay (Time Shift)
The function is optional and is not active in the standard set of server functions. You may need additional licensing to activate this function.
Rebroadcasting the accepted signal with a few hours time shift is a highly requested feature. Time Shift server software module is used to implement this function. The module has one input, one output and allows setting the delay value of the output stream relative to the input signal in hours, minutes, seconds. The maximal delay value is 240 hours, the minimal value is 3 minutes.
The principle of module work is constant recording the input stream into files and further playout after a set period of time. Configuring the Time Shift module is implemented in the following way:
Adding Time Shift Module to Server Configuration
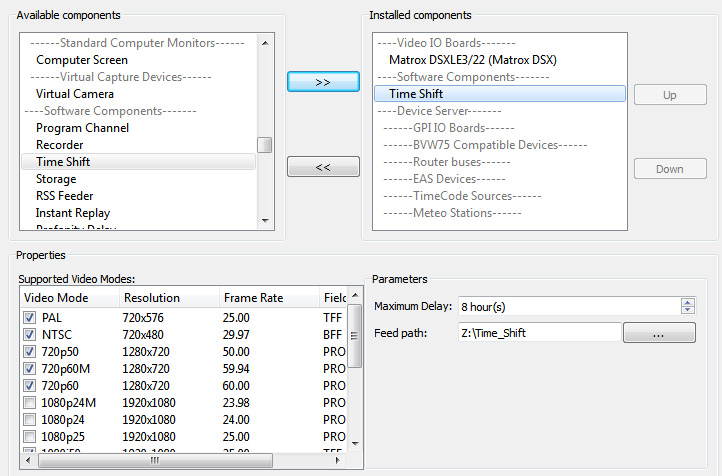
Right click on the blue SL NEO icon in the taskbar and select Stop Server to stop the server components. After some time the icon will change its color to red. Right click it and select Configure Server Components. Find the Available components field in the setting window and add the Time Shift element to the right field.
The Time Shift module is functioning simultaneously with I/O devices. Make sure the corresponding element of server software responsible for input/output is present at the system.
Open the Parameters window and specify the Maximum Delay value - time value defining the maximal delay in hours. Recordings will be saved at the disk during the set time, the “later“ information will be automatically deleted. In the Feed Path field, specify a path to the folder for storing files in the recording process.
Configuring Time Shift Parameters
After the start of server software, further settings will be implemented from the Administrator Control Panel. Login to the console is implemented locally from the server or from any computer in the network at http://server_ip:7901. Login to the control web console as an administrator.
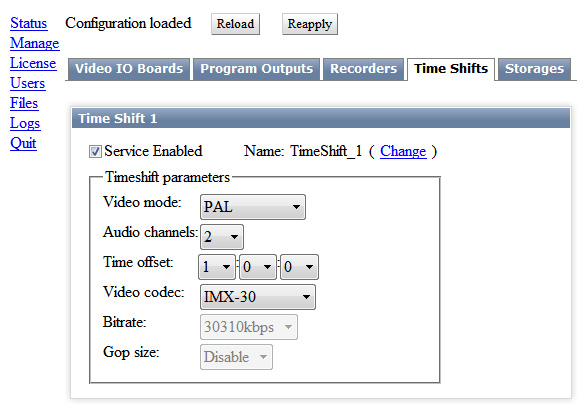
After login to the console, choose Manage from the left menu, find the Time Shift tab and click Service Enable in the Time Shift 1 window.
Open the Time Shift Parameters window and configure the main parameters of the module:
Select the needed TV format in the Video Mode field, set the number of audio channels in the Audio Channels field.
The Time Shift module works with uncompressed streams coming from adjacent software modules. Compressed streams received by the AV/TS Capture module through ASI/IP interfaces will be decompressed and encoded again when recording into files.
Set the needed delay value in the Time Offset field. In the Video Codec, Bitrate and GOP Size fields, select the encoding algorithm and compression parameters (speed and size of the group while using MPEG algorithms).
Configuring the module is finished: press Apply Changes at the top of the control console window to apply changes.
Connecting Time Shift to I/O Modules
Select Status in the control console main menu. This section displays current status of configured modules on the server platform and implements switching streams to the modules inputs.
There are a few switching options:
- From the Capture input to the Time Shift output, from the Time Shift module output to the Playout module input.
- From the Capture module output to the Time Shift input, from the Time Shift module output to the Program Player module BG input. This option allows commercials insert into the delayed stream and graphics overlaying.
- From the Capture module output to the inputs of several Time Shift modules, from the output of every Time Shift module to the corresponding Playout module input. This option allows setting a delay from one input to several outputs, with different time values.
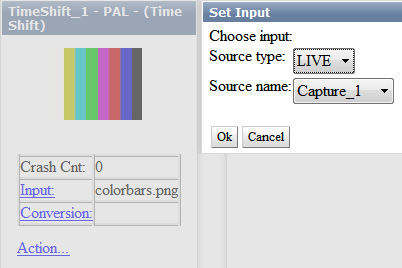
For switching the stream to the Time Shift module input, select the Input item in the corresponding icon: select the LIVE source in the opened window and find the necessary capture service in the Source name field.
The same way is used to set the stream from the Time Shift output to the Playout or Program Channel input.


