Table of Contents
Configuring automatic switching of signals to server inputs during recording
The SL NEO 1000 and 3000 series servers allow you to automatically switch (preselect) signals from multiple sources for recording. The matrix switch is controlled directly when executing the record channel record list, according to the events in the record list, signal sources are automatically switched to a specific output of the switch, which is connected to the server input.
This function is optional and is not active in the standard set of server functions. Additional licensing is required to activate the feature.
Step 1. Connect the matrix switch
You need to connect the management port of the switch to the server. The server has at least one RS-232 control port (COM1) located on the back of the system unit. If the switch has an RS-422 control interface, you must use an interface converter or card containing the appropriate ports. In some cases, it is possible to use Ethernet interfaces for control.
SL NEO platform supports control protocols for switching equipment manufactured by Harris/Leitch, Evertz, Network Electronicz/Nevion, BlackMagic Design, etc.
Before selecting a switch model and connecting it, contact our support team for hardware and control protocol compatibility.
Step 2. Add a new device to the server configuration
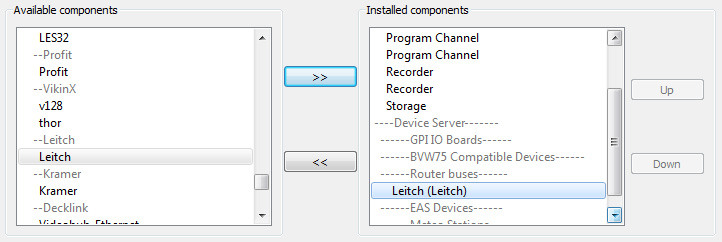
Right-click on the blue SL NEO icon in the taskbar, select Stop Server and stop the server components. After the icon changes color to red, by right-clicking on it select Configure Server Components. In the settings window, from the Available components field, add the switch model from the Device Server/Router buses section to the right field.
Step 3. Configure the external device management service
Start the SL NEO server software (the Start Server command on the tray icon). Further settings will be performed from the Administrator Control Panel. Logging into the management console is done locally from the server, or from any machine in the network at http://ip server:7901. You should log into the management console as an administrator. After logging into the management console:
In the left console menu, select Manage. Select the Router Buses tab, and in the Router Bus 1 window select Service Enabled.
In the Connector field, select the control interface type and port number. In the Matrices box select Add matrix.
In the new window, in the Name field enter the unique name of the matrix in the system (for example, router1) and select the size of the switch. The Address field can be left unchanged at localhost. To save the settings, at the top of the Server Management Console window, click Apply Changes.
Step 4: Verify Switch Management
Verify switch management from the RT Client application. Refer to the RT Client configuration procedure in the corresponding description.
Step 5. Configure switch management from the recording service
The settings will also be made from the server control panel - Administrator Control Panel. In the left menu of the console select Manage, then the Recorder1 tab.
At this point, you need to configure the passage of commands from the recorder to the device management service. In the Recorder 1 window, select the General tab, then select the Router Layers field.
After clicking Add a dialog box will open, in the Router Name field enter the previously set unique name of the matrix in the system (router1 in our example), in the Service Address field specify the IP address of the server where the switch management service is active. In our example, the service is running on the server itself (localhost), so you can leave the window blank. Leave 1 in the Router Bus field and click OK.
In the General tab, in the Router output pin field, specify the number of the matrix switch output, which is assigned to the corresponding server input.
Similar settings should be made for all recording services. To save the settings, click Apply Changes at the top of the Server Management Console window.
To perform switching, specify the switch input number in the Input pin column of the rec list line. You can check the commands to the switch from the RT Client application.


