Table of Contents
Examples of Creating Captions in Graphics Editor
Note: the description is valid for software versions 1.7.50 and higher.
Let’s consider examples of creating captions in the graphics editor.
Before editing, download these files:
- file with an initial phase of “opening” the dynamic backing
- file with a “cycle” phase of the dynamic backing
- file with a final phase of “closing” the dynamic backing
The resolution parameters are 1920×1080 - after downloading, import all files to the server database.
The New/Graphics command at the right part of the Media Browser window allows creating a new graphic design clip. After specifying the number of audio-channels and video format for the created composition in the dialogue window, you will see the integrated graphics editor window.
Example #1. Captions with Dynamic Backing with Appearance/Disappearance Effects
The picture at the page top illustrates an example of a composition design.
General Composition Settings
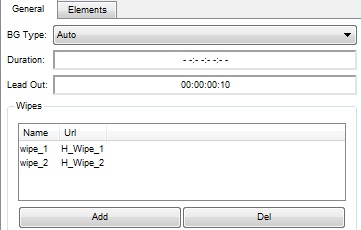
 In the General section, configure general settings of a new composition. BG Type - the type of backing: Opaque or Transparent. The default value is Auto: Transparent, leave it unchanged.
Duration - general duration of a graphic composition. The default value –:–:–:– means that the composition has infinite duration, leave it unchanged.
The Lead Out parameter defines the time needed for a composition with infinite duration to implement exit effects for its objects. In our example, final effects of all objects will have 10 frames duration. To make Stop Seq or GoTo commands in the playlist of graphic events finish the “infinite” composition correctly, with final effects, specify the Lead Out value equal to effect duration - 10 frames.
Wipes - adding static images (BW transition templates) into the composition. By pressing Add, add H_Wipe_1, then H_Wipe_2. The Show wipe item allows viewing templates in the editing window.
Creating Objects
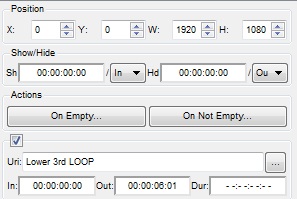
Open the Elements tab. Place the Media Browser window near the graphics editor and drag the loaded clip with a “cycle” and the Lower 3rd LOOP backing directly to the editing window. This automatically creates a new PIP object: the clip name will be read off from the database (and inserted into the first Url field), as well as In and Out values. The original clip size will be saved. The Dur field value won’t be set automatically; the default value is –:–:–:–, meaning the clip with a backing will be played in an infinite cycle.
Create the first text object by the New Text Object button in the editor Top-menu: title NEWS. In the Name field of the Elements tab, set a random name for the object. Select an object in the Elements tab and right click it to move to the higher layer (Raise) relative to the backing. Now configure the object font, color, fringe and position.
Similarly, create two other text objects: the main news text (Main Title) and additional text (Small Title). You can set the parameterization type for main and additional texts (Elements section – Parameterization item – Type field). Select the External type: this allows changing texts directly from the playlist, or using Time Line in the News Cut app (without using the editor).
Backing Appearance and Disappearance Effects
 The backing has W=1920, H=1080 resolution parameters and is placed in the composition with no shift (X=0, Y=0, see the Position field).
It will be displayed during the whole composition, so Sh/In and Hd/Out values in the Show/Hide field are 00:00:00:00.
The file with the backing has 00:00:06:01 duration - leave the –:–:–:– value in the Dur field to cycle displaying.
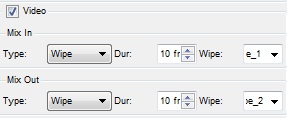
 Mix In/Mix Out fields define the appearance/disappearance effects for every object:
Cut - default value, no effect;
Fade - smooth appearing (so-called mixer), specify the transition duration in frames in the Dur field;
Wipe - the Gradient Wipe effect that uses a static picture containing a transition template (Wipe). Set similar values for appearing and disappearing of the backing: Type=Wipe, Dur=10 Frames, select Wipe (In)=wipe_1, Wipe (Out)=wipe_2 (see the picture).
To view mix/wipe effects in the editing window, activate the black button “X” in the editor Top-Menu: move the scrolling bar at the editor lower part and see the result.
Text Appearance and Disappearance Effects
Configure the NEWS and Main Title text objects: set the same Show/Hide and Mix In/Mix Out parameters, as for the backing.
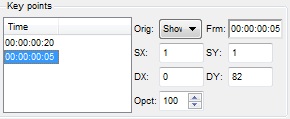
Program the animation by key points for the Small Title object. To set the first key point, use the scrolling bar and set the point that will start the effect (for example, 00:00:00:05). Then set the first point: press “+“ at the editor top field. The time value conforming the first key point will appear in the Key Points – Time field. Fields for editing values will become active.
Additional parameters for work with Кеу Points:
The Clip to original option restricts the object visible area with values originally set in the Position field (position along XY axes and sizes of the WH area). Activation of this parameter allows the text to come out along the Y axis, for example, not from the very bottom edge of the screen, but from its current bottom position.
Smooth - gradual change of moving speed. If the parameter is not set, the object moving speed from point to point will be linear. If the parameter is activated, the speed will be smoothly reducing when it's close to the point.
 Then, you can move the scrolling bar 15 frames forward and set one more key point (00:00:00:20), select the first point value (00:00:00:05) in the Time window and configure parameters for moving the text.
DX and DY shift the text along the coordinate axes for the set number of pixels. Set the DY value equal 82 for the first point: the text will move down. The second point value stays “0”, so the text will come out from the bottom during the effect execution. The result is displayed by moving the scrolling bar at the editor bottom part.
Editing of the composition is finished. You can download an example of a ready composition by this link. After downloading the file, import it to the server database.
Graphics Playback in Manual Mode
To playgraphic clips, use one of the Broadcast windows (CAST_LAY1…CAST_LAY8). The corresponding window can be launched from the Window/Broadcast menu of Air Manager. Similarly to full screen playout, every CAST_LAY… window displays a list of on-air events for a corresponding graphic layer.
There is an option of simultaneous playback of several graphic playlists (up to eight), with a separate playlist for every layer (LAY1 playlist/layer is the lowest).
To create a new playlist line, drag the selected clip from the Media Browser window to the Broadcast window (e.g., CAST_LAY1). Clip information will be automatically inserted into the line. The Start column allows setting a desirable type of start for the event (Auto=Sequence by default).
For the manual mode of graphics playback (e.g., in broadcasting studios), it is better to set the Manual start for every event. Changing the type of start is available in the editing mode: click the line once and press Enter, or click the line twice.
Setting Default Type of Start
The Air Manager File/Configure menu allows changing the default type of start for all recreated events. Select the Actions tab and set Manual in the Default Start Type field.
Now you can play events in a random sequence by selecting them in the playlist. You can start playback by pressing GoTo, and stop it by Stop Seq. If the Lead Out parameter was set while editing, compositions will be finished correctly, with final effects.
Quick text replacement in the composition without using an editor may be implemented by selecting the Parameters item (right-click the selected playlist line). More details about text parameterization by this link.
For more convenient playback management, configure Hot Keys or use an external control panel. Configuring Hot Keys is described here.
