Table of Contents
Setting Automatic On-Air Switching of Signals from External Lines
SL NEO servers allow automatic switching signals to the air from one or several external lines. Managing the switching process is implemented directly during playlist execution: setting an individual scheme of switching is available for every program channel functioning at the SL NEO server.
The following technologies are used for including signals from external sources into the program being created:
- Managing the external matrix switch by the “switcher after server” scheme. On-air sources of signals (server outputs, broadcasting studios, mobile TV units etc) are automatically switched to a certain program output of the matrix with frame-by-frame accuracy, according to events in the executable playlist.
- Switching input signals by the server facilities, from its inputs to outputs. Switching is implemented with frame-by-frame accuracy, with the option of “preselecting“ external sources for inputs of the matrix switcher controlled by the server and placed by the “before the server” scheme.
You can use any of the technologies or combine them. As a rule, it is discussed at the stage of building the functional scheme of a broadcasting complex.
“Switcher before Server” Scheme
Configuring internal program switching using server inputs.
The SL NEO platform offers at least two solutions that allow broadcasting signals from SL NEO server inputs to its outputs and controlling “internal” switching of input signals inside the server, simultaneously with playout of playlist files.
- Using LIVE-clips as playlist sources.
- Using the Background layer for a program channel as a source of the input signal.
Unlike the “switcher after server” scheme, program switching by the SL NEO server facilities does not impose limits synchronousness, phase synchronism or even formats of input SD/HD signals. Switching will be implemented correctly and seamlessly, but the input signal will be delayed for a few frames (because of its buffering in the server RAM).
The advantage of this solution is the absence of demands to the format (SD/HD) and synchronism of input signals. Besides, there's no need to use external graphic stations: graphic design is implemented by the broadcasting server facilities (both during file playback and broadcasting from external lines).
The picture illustrates the concept-scheme of the broadcasting complex path with program switching implemented by the SL NEO server (using only its inputs):
Using LIVE-Clips to Switch Playlist Sources
First, create a LIVE-clip in the server database. «LIVE» is the specialized clip type in the server database that contains a link not to the media file, but to the source of signal/stream coming to the server input. You can create a few clips, according to the number of server inputs, and then use them in an on-air playlist or as a part of graphic compositions.
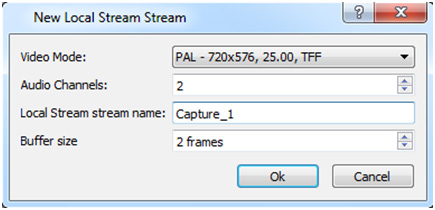
Creating new LIVE-clips is implemented in the Air Manager client application with running server software. The New/Local Stream command at the right of the Media Browser window allows creating a new clip that contains a link not to the media file, but to the source of signal/stream coming to the server input.
The Video Mode field allows selecting a standard of input video, the Local Stream name field allows specifying a name for a corresponding capture service. The list and names of configured services are available in the Status field of the server control panel. Create a separate clip for every input. Created Live-clips may be used in a usual way - in playlists and graphic compositions.
Using Background Layer as Input Signal Source
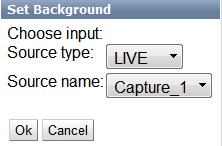
When the playlist is stopped, the signal from the server input may be broadcasted to its output. When the playlist is executed, file playout “overlaps” the input signal. To set this mode, configure the playback channel and specify a background-source (capture service) for it.
Configuring this option is implemented from the server control web-console (Status menu item, Program windows). Select the Background item in the window, then specify the LIVE source type for it and select the corresponding capture service.
Controlling Matrix Switcher from Playlist for Automatic Preselection of Signals to Server Inputs
Starting from version 1.8.99 operation of this function has been fixed.
The function is optional and is not active in the standard set of server functions. Activating the function requires additional licensing.
Step 1. Connecting a matrix switcher
Connect the switcher control port to the server. The server has at least one RS-232 (COM1) control port placed at the back panel of a system unit. If a switcher has an RS-422 control interface, it is necessary to use an interface converter or a board with proper ports. In some cases, it is possible to use Ethernet interfaces for matrix control.
The SL NEO platform supports management protocols for switching equipment by Harris/Leitch, Evertz, Network Electronicz/Nevion, BlackMagic Design, etc.
Before choosing a switcher model and connecting it, contact our technical service for more details on hardware compatibility and management protocols.
The next step is connecting signals. Switching must be implemented according to the path concept scheme displayed at the picture for this variant. Program switching by the facilities of SL NEO server does not impose any restrictions to synchronism, phase synchronism or formats of input signals (SD/HD).
Step 2. Adding a new device to the system
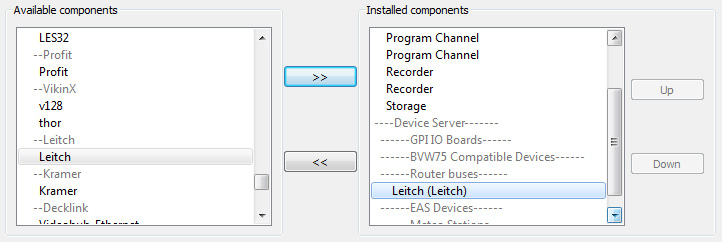
Right click on the blue SL NEO icon in the taskbar and select Stop Server to stop the server components. When the icon becomes red, right click it and select Configure Server Components. In the setting window, find the switcher model in the Device Server/Router buses section and add it from the Available components field to the right field.
Step 3. Configuring the switcher management service
Further settings will be implemented from the control panel - Administrator Control Panel. Login to the console is implemented locally from the server or from any machine in the network by the address http://ip of the server:7901. Login to the control web console as an administrator. After logging in to the control console:
Select Manage from the console left menu. Find the Router Buses tab and click Service Enabled in the Router Bus 1 window. Choose the management interface type and port number in the Connector field. Select Add matrix in the Matrixes field.
In the new window, find the Name field and enter a unique random Latin name for the matrix in the system (e.g., router1) and specify the router dimension. Changing the Address field is not necessary, if the value is localhost. To save settings, click Apply Changes at the top of the server control console.
Step 4. Check the switcher management from the RT Client application
Detailed information on configuring RT Client is in the corresponding description.
Step 5. Configure the rule (Action) to control preselection from the playlist
Let’s configure a rule at the server platform, according to which, when adding a Live-clip with a name containing the source title (e.g., with the name studio1) to the playlist, the switcher implements a certain switching three seconds before transitioning to the given Live-event.
Configuring is implemented from the SL NEO server control web-console (Manage item, Program Outputs tab). Find the Actions tab in the selected Program Channel, select the Playlist events field and click Add Action. Enter the parameters for a new rule (Action) in the opened window.
Find the Name field in the Action Configuration window and set a random name for the rule. Set “1” (the main fullscreen layer of the program channel) in the Layer field. In the Delay field, set the time value (in milliseconds) from the moment of switcher triggering till the transition between playlist events. The time value is set as 3 seconds, so the Delay field requires the value “3000”: it means that the switching command will be sent to the switcher 3 seconds before transitioning to the LIVE-event in the playlist.
The Delay field value shouldn't exceed 5000 (5 sec), because the Program Channel service automatically prepares the next clip for playout 5 seconds before the transition. The time value of 5 seconds, responsible for preparing the next clip, is set by the software developer and cannot be changed.
In the Address field, set the server IP address or leave the field empty, if the value is localhost. By the … button in the Service field choose a service for management - the RouterBus_1 service for switcher management.
Find the Variable field in the Action condition window and set the playlist column that will be responsible for sending commands to the switcher. Choose Media URL (clip name) from the list, set the trigger to EQUAL, enter studio1 in the Value field. Activate the only parameter - Trigger at start when primary matches. Settings implemented in the Action condition window make the rule trigger, when the clip named studio1 appears in a playlist column.
Find the Param 1 field in the Action parameters window and set a unique name for the matrix in the system (router1 in our example, see “step 3”).
In the Param 2 field, set the number of the switcher output that is physically connected to the server input bound to a corresponding LIVE-clip (Capture service). In the Param 3 field, set the number of the switcher input physically connected to the signal from an external source (studio1 in our example).
Configuring is finished: to save settings, click Apply Changes at the top of the control console window. The configured playout channel will be reloaded, its playback will be stopped while reloading.
The rest of LIVE-clips set to receive signals from external sources require similar configuring: every LIVE-clip that needs “preselection”, requires its own rule.
Passage of commands to the switcher may be checked in the RT Client application, or in the corresponding Message window (it is opened by right clicking the icon of SL NEO server software in the server console desktop tray, Router Bus tab).
“Switcher after Server” Scheme
Program switching using the external matrix switcher.
The function is optional and is not active in the standard set of server functions. Activating the function requires additional licensing.
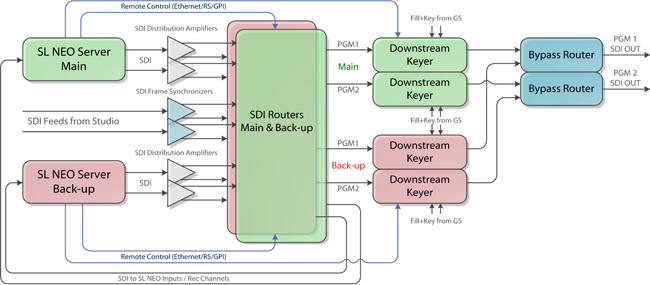
The scheme of building a path with synchronous sources is classical and historically developed, it requires certain costs for the main synchronization system (REF), modules of frame synchronization for external sources, separate DSK modules and external graphic stations. The scheme proves its value in situations involving a big number of sources - as a rule, federal broadcasting channels.
The picture illustrates the concept scheme of a broadcasting complex path using the external matrix switcher as a program one:
Connect the switcher control port to the server and implement settings described above (see Step 1 - Step 4).
Step 5. Configuring switcher management from the program channel
Settings will be implemented from the server control panel - Administrator Control Panel. Select Manage from the console left menu, find the Program Outputs tab.
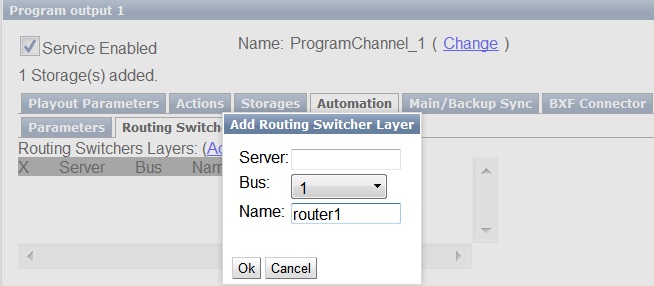
Select the Automation tab in the Program Output 1 window, then click the Routing Switchers tab. Clicking Add will launch a dialogue window for specifying the IP address of the server with the activated switcher management service. In our case, the service is launched at the server itself (localhost), so the window may remain empty. Leave the value “1” in the Bus field, enter the unique previously set name for the matrix in the system (router1 in our example) in the Name field and press OK.
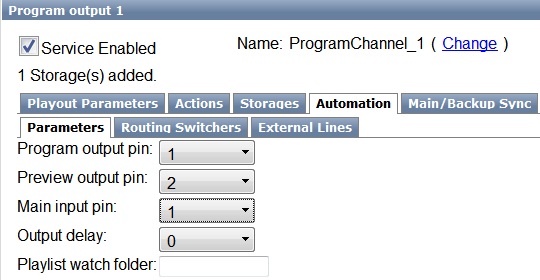
Move to the Parameters tab. In the Program output pin field, specify the number of the switcher output that will be used for reading the program signal of a given broadcasting channel.
In the Preview output pin field, set the number of the switcher output that will be used for reading the preview signal. The preview signal is auxiliary: the system automatically switches the external line signal to the given output 10 seconds before the actual on-air switching. This gives the operator an opportunity of prompt managing a particular input signal at the monitor with no manual preset.
In the Main input pin field, select the switcher input connected (by the scheme) to the server playout channel working for this program channel. The Output delay parameter defines the switching moment latency in frames.
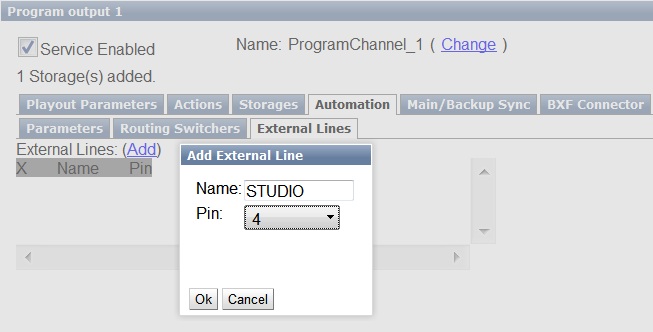
Specifying external lines is the last step implemented in the External Lines tab. Clicking Add launches a window for setting a new line.
Specify a random name for the source in the Name field, choose the corresponding number of the switcher input in the Pin field.
The source name set in the Name field will be further used in a playlist of this program channel for specifying a broadcast source (set in the Player playlist column).
The system checks if the name is correct, showing the “No Player” message in the playlist line, in case of a mistake in the external source name.
Similar settings must be performed for the rest of program channels.
To save the settings, click Apply Changes at the top of the server control console window.

